Please Wait - Building a WaitScreen control for ASP.NET
Sometimes it happens that a form is processing and you need to make sure that the users don’t panic and run away before it finishes.
A splash screen with a “Loading…” indicator can help to calm down frightened users and make life easier for technical support staff.
Back in the days of classic ASP (VBScript) which used a linear programming approach we had to start by setting the response buffer to true:
<%
Response.Buffer = True
%>
This line does nothing but instructing the server NOT to send anything back to the client until the page has been finished processing.
An exception can be forced by calling the flush command:
<%
Response.Flush()
%>
Calling flush lets the server send everything to the client that is processed so far.
This will also speed up your page since the server doesn’t have to switch back and forth between executing the page and sending bits to the browser.
Using this we were able to accomplish the following steps:
- Send e.g. a div-layer containing a “Loading…” graphic to the client
- Process the long running task.
- Send the results of the long running task to the client
- Send a client side script to the client, that hides the div-layer containing the “Loading…” graphic
The script then might look like this:
<%
Response.Buffer = True
%>
<!DOCTYPE html PUBLIC "-//W3C//DTD XHTML 1.0 Transitional//EN"
    "http://www.w3.org/TR/xhtml1/DTD/xhtml1-transitional.dtd">
<html xmlns="http://www.w3.org/1999/xhtml" >
<head>
    <title>Wait Screen</title>
    <script type="text/javascript">
    //<![CDATA[
    <!--
        if(document.getElementById)
        {
             var upLevel = true;
        }
        else if(document.layers)
        {
             var ns4 = true;
        }
        else if(document.all)
        {
             var ie4 = true;
        }

        function hideObject(obj)
        {
            if (ns4)
            {
                 obj.visibility = "hide";
            }
            if (ie4 || upLevel)
            {
                 obj.style.visibility = "hidden";
            }
        }
    // -->
    //]]>
    </script>
</head>
<body>
    <div id="splashScreen">
        <img src="wait.gif" width="75" height="15" />
    </div>
    <%
        Response.Flush()

         'All processing here...

        Response.Flush()
    %>
    <script type="text/javascript">
    //<![CDATA[
    <!--
        if(upLevel)
        {
               var splash = document.getElementById("splashScreen");
        }
        else if(ns4)
        {
               var splash = document.splashScreen;
        }
        else if(ie4)
        {
               var splash = document.all.splashScreen;
        }
        hideObject(splash);
    // -->
    //]]>
    </script>
</body>
</html>
I haven’t mentioned yet that client side Javascript initially checks what kind of browser we have to deal with (either up level like Internet Explorer 7.0, other Internet Explorer’s or Netscape 4.x).
But with ASP.NET we have got a complete different way of how the page is executed. Today we have a Page class, which has an event based execution model and controls – so how can this mechanisms be used in ASP.NET?
The difference between classic ASP and ASP.NET, that initially seems to be a problem, is really an advantage. It gives us the ability to write and store our code in a more structured manor.
This way we can separate infrastructure code form application logic code. It lets us focus on the things we, as application developers, really need to do – To get things done.
First of all we need to do a few initial steps:
· Start Visual Studio (or use notepad.exe)
· Creating a new Project of the type “Class Library” (on skip this if you are using notepad)
· Rename Class1.cs to WaitScreen.cs (or just save your file as WaitScreen.cs using notepad)
· Add a reference to the namespace “System.Web” (or remember to add the compiler switch /r pointing to the assembly System.Web.dll)
After our environment has been set up we can start writing the code. First we outline the class to use it as a WebControl by deriving it from the WebControl class.
using System;
using System.ComponentModel;
using System.Web.UI;
using System.Web.UI.WebControls;

namespace StaticDust.Web.UI.Controls
{
    /// <summary>
    /// The WaitScreen control displays a grafic while a long running operation
    /// is running.
    /// </summary>
    public class WaitScreen : WebControl
    {

    }
}
Controls are reusable components so it is important to let the client side developer (the guy who uses the control in Visual Web Developer – this might also be you…) the opportunities to customize the layout of the control. In our case the only customization that can be done would be a different graphic that is displayed during the long running operation is executed on the server. Here is the code that allows the client side developer to easily set a URL, pointing to an graphics file, form an attribute on the ServerContol or by directly setting the value of the property from the code behind.
...

// This field holds the URL pointing to an image

private string m_ImageUrl = "~/images/busy.gif";

...
The private field m_ImageUrl is initialized with a default image on the instantiation of the class so – if the image exists – the client side developer mustn’t explicitly set anything.
...

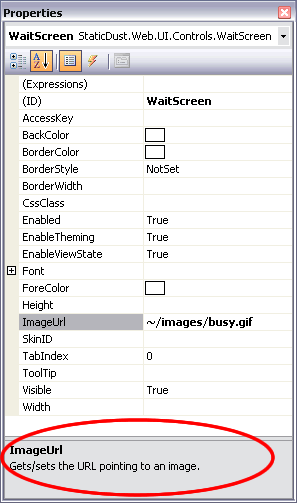
/// <summary>Gets/sets the URL pointing to an image.</summary>
/// <value>A <see cref="string">string</see> containing the URL pointing
/// to an image..</value>
/// <remarks>This property gets/sets the URL pointing to an image.
/// </remarks>
[Description("Gets/sets the URL pointing to an image.")]
public string ImageUrl
{
    get { return m_ImageUrl; }
    set { m_ImageUrl = value; }
}
...
The property ImageUrl just gives public access to the private field m_ImageUrl. Having (again) the client side developer in mind we provide the XML comments summary, value and remarks and additionally set the description attribute, which allows Visual Studio to display details in the properties window.
Delegates and events are one of the most powerful tools that come with .NET Framework and we can use them to let the client developer attach his/her custom long running operation as custom event handler code. Even more then one method can be attached so that all together are the “one long running task” that is processed while the graphic is displayed. Separated nicely from the infrastructure code (the control we are currently writing). Here is our event code:
public delegate void ProcessHandler(object sender, EventArgs e);
The delegate defines (like a function pointer) how the event handler code should look like.
/// <summary>
/// The process event.
/// </summary>
public event ProcessHandler Process;
The event named “process”, to attach custom long running operations to.
/// <summary>
/// Triggers the Process event.
/// </summary>
public virtual void OnProcess()
{
   Process(this, null);
}
The OnProcess method triggers the event and invokes the attached custom long running operations.
Now that the ability is given that custom code can be executed using the event/delegate we need to actually raise the event and before that ensure that the response buffer is set to true and the graphic is send to the client. The load event of out control does this job for us.
/// <summary>

/// Triggers the Load event.

/// </summary>

protected override void OnLoad(EventArgs e)

{

    base.OnLoad(e);


    Page.Response.Buffer = true;


    #region Show splash screen


    Page.Response.Write(

        string.Concat(@"<script type=""text/javascript"">

//<![CDATA[

<!--


if(document.getElementById)

{ // IE 5 and up, NS 6 and up

    var upLevel = true;

}

else if(document.layers)

{ // Netscape 4

    var ns4 = true;

}

else if(document.all)

{ // IE 4

    var ie4 = true;

}


function showObject(obj)

{

    if (ns4)

    {

        obj.visibility = 'show';

    }

    else if (ie4 || upLevel)

    {

        obj.style.visibility = 'visible';

    }

}

function hideObject(obj)

{

    if (ns4)

    {

        obj.visibility = 'hide';

    }

    if (ie4 || upLevel)

    {

        obj.style.visibility = 'hidden';

    }

}

// -->

//]]>

</script>

<div id=""splashScreen""><img src=""",

        new Control().ResolveUrl(m_ImageUrl),

        @""" alt=""busy"" /></div>"));


    #endregion


    Page.Response.Flush();


    OnProcess();


    Page.Response.Flush();


    #region Hide splash screen


    Page.Response.Write(

        @"<script type=""text/javascript"">

//<![CDATA[

<!--
var splash

if(upLevel)

{

    splash = document.getElementById('splashScreen');

}

else if(ns4)

{

    splash = document.splashScreen;

}

else if(ie4)

{

   splash = document.all.splashScreen;

}

hideObject(splash);

// -->

//]]>

</script>

");


    #endregion

}
After OnProcess is called we call Flush like we did in classic ASP and send the piece of client side script to the client that will hide the div-layer containing the graphic indicating the user that something is happening.
On the client side the control can now be used as follows in the *.aspx-Page:
<%@ Page Language="C#" CodeFile="Default.aspx.cs" Inherits="_Default" %>


<%@ Register Assembly="StaticDust.Web.UI.Controls.WaitScreen"

    Namespace="StaticDust.Web.UI.Controls" TagPrefix="ctrl" %>


<!DOCTYPE html PUBLIC "-//W3C//DTD XHTML 1.0 Transitional//EN"

    "http://www.w3.org/TR/xhtml1/DTD/xhtml1-transitional.dtd">


<html xmlns="http://www.w3.org/1999/xhtml" >

    <head runat="server">

        <title>Long running operation on this page...</title>

    </head>

    <body>

        <form id="form1" runat="server">

        <div>

            <ctrl:WaitScreen

                ID="WaitScreen"

                runat="server"

                OnProcess="WaitScreen_Process"

                Height="136px"

                Width="177px" />

        </div>

        </form>

    </body>

</html>
``

And the associated code behind page:

```csharp
using System.Threading;


public partial class _Default : System.Web.UI.Page

{

    protected void WaitScreen_Process(object sender, EventArgs e)

    {

        // simulate long running operation in here...

        Thread.Sleep(4000);

    }

}
Design-time isn’t as easy as I would wish and therefore the functionality in this specific area is often kept short or even missing. One of the biggest problems is the missing HttpContext. Without it we cannot ask for example for the path of the current page, web environment variables, URL-parameters and so on…
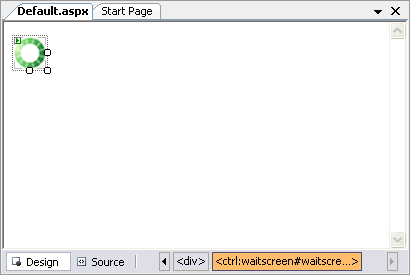
Our control is really a good example to show how we can add this kind of functionality because it is quite simple. The goal is to show the image set by the control default or the client side developer in the designer of Visual Web Developer.
So we add a new class to our project and name it “WaitScreenDesigner.cs”. To access the built-in designer functionality we need to add reference to the “System.Design” assembly and a using declaration to the System.Web.UI.Design namespace on top of our control class. We also need to derive it from the ControlDesigner-class:
using System;
using System.Web.UI.Design;


namespace StaticDust.Web.UI.Controls

{

    public class WaitScreenDesigner : ControlDesigner

    {

    }

}
The designer of Visual Web Developer calls the method GetDesgnTimeHtml on the base class to generate the Html to display – If we override that method we can control what the designer shoes to the client side developer of our controls.
To display the defined image we need to access the property of our control from the designer’s class’s method. Visual Studio’s extensibility API’s enable us to cast form the Component property of the designer to our control and easily read values of properties. The following example gets the value of the control’s class property ImageUrl:
string imageUrl = ((WaitScreen)this.Component).ImageUrl;
Now that we have the set path to an image we should be able to display the image in an <img>-Tag except the URL contains the useful „~/“, which tells ASP.NET that the path starts with the root path of the current application. To translate such an URL to a physical path that we can use we need an instance of the web application – as the control this can be achieved though casting with the Component property of the designer.
IWebApplication webApp =

(IWebApplication)Component.Site.GetService(

typeof(IWebApplication));
The next step is to find the image as project item of our web project. The IWebApplication interface provides the method GetProjectItemFromUrl, which fits our needs.
IProjectItem item = webApp.GetProjectItemFromUrl(imageUrl);
On the interface IProjectItem we will now find a property called PhysicalPath that we can use as value for the src attribute of an -Tag, which will be returned form the GetDesignTimeHtml method:
return string.Concat(

"<img src=\"",

item.PhysicalPath,

"\" alt=\"Please wait...\" />");
Now its time to tell the Designer that our control should be rendered with our designer class we just created. This is done by assigning the DesignerAttribute to the control class.
[Designer(typeof(WaitScreenDesigner))]

public class WaitScreen : WebControl

{

...
If you now look at the designer the page should look like the following screenshot:
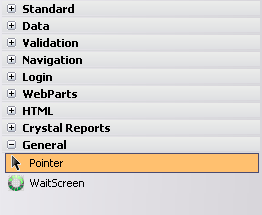
To make it even more comfortable the control can be add to the Toolbox. But if you don’t want your control to be displayed as the “default 3rd party control grind” we still have one job to do.
Add a 16x16 pixel icon file names WaitScreen.ico to the root of the project as embedded resource. And add the following attribute to the control class:
[ToolboxBitmap(typeof(WaitScreen),

"StaticDust.Web.UI.Controls.WaitScreen.ico")]

public class WaitScreen : WebControl

{

...
The long name is in the format {default_namespace_of_project}.{filename_and_ext} just in case you wonder where the devcoach.Web.UI.Controls.” comes from.
Now you’ll see your icon instead of the “default 3rd party control grind”.


